ここでは、Three.js公式サイトのExamplesを写経して、Three.jsの理解を深めます。
今回は、こちらを取り上げます。はじめに全体のソースを俯瞰して確認し、それぞれがどのような処理を行っているのかを詳しく見ていきます。
なお、ここではHTMLとJSを分けています。また、実行に必要な画像などのリソースは事前に、Gitから取得しています。
1. ソース
HTML
<!doctype html>
<html lang="ja">
  <head>
    <meta charset="UTF-8" />
    <link rel="stylesheet" href="/src/style.css" type="text/css" />
    <meta name="viewport" content="width=device-width, initial-scale=1.0" />
    <title>Three.js Code Sample </title>
  </head>
  <body>
    <div>Sample from <a href="https://threejs.org/examples/#webgl_geometries">Three.js Examples.</a></div>
    <script type="module" src="/src/main.js"></script>
  </body>
</html>
JavaScript
import * as THREE from "three";
import Stats from "three/addons/libs/stats.module.js";

let camera, scene, renderer, stats;

init();

function init() {
  const w = window.innerWidth;
  const h = window.innerHeight;
  camera = new THREE.PerspectiveCamera(45, w / h, 1, 2000);
  camera.position.y = 400;

  scene = new THREE.Scene();

  let object;

  const ambientLight = new THREE.AmbientLight(0xcccccc, 1.5);
  scene.add(ambientLight);

  const pointLight = new THREE.PointLight(0xffffff, 2.5, 0, 0);
  camera.add(pointLight);
  scene.add(camera);

  const map = new THREE.TextureLoader().load("textures/uv_grid_opengl.jpg");
  map.wrapS = map.wrapT = THREE.RepeatWrapping;
  map.anisotropy = 16;
  map.colorSpace = THREE.SRGBColorSpace;

  const material = new THREE.MeshPhongMaterial({
    map: map,
    side: THREE.DoubleSide,
  });

  object = new THREE.Mesh(new THREE.SphereGeometry(75, 20, 10), material);
  object.position.set(-300, 0, 200);
  scene.add(object);

  object = new THREE.Mesh(new THREE.IcosahedronGeometry(75, 1), material);
  object.position.set(-100, 0, 200);
  scene.add(object);

  object = new THREE.Mesh(new THREE.OctahedronGeometry(75, 2), material);
  object.position.set(100, 0, 200);
  scene.add(object);

  object = new THREE.Mesh(new THREE.TetrahedronGeometry(75, 0), material);
  object.position.set(300, 0, 200);
  scene.add(object);

  object = new THREE.Mesh(new THREE.PlaneGeometry(100, 100, 4, 4), material);
  object.position.set(-300, 0, 0);
  scene.add(object);

  object = new THREE.Mesh(
    new THREE.BoxGeometry(100, 100, 100, 4, 4, 4),
    material
  );
  object.position.set(-100, 0, 0);
  scene.add(object);

  object = new THREE.Mesh(
    new THREE.CircleGeometry(50, 20, 0, Math.PI * 2),
    material
  );
  object.position.set(100, 0, 0);
  scene.add(object);

  object = new THREE.Mesh(
    new THREE.RingGeometry(10, 50, 20, 5, 0, Math.PI * 2),
    material
  );
  object.position.set(300, 0, 0);
  scene.add(object);

  object = new THREE.Mesh(
    new THREE.CylinderGeometry(25, 75, 100, 40, 5),
    material
  );
  object.position.set(-300, 0, -200);
  scene.add(object);

  const points = [];
  for (let i = 0; i < 50; i++) {
    points.push(
      new THREE.Vector2(
        Math.sin(i * 0.2) * Math.sin(i * 0.1) * 15 + 50,
        (i - 5) * 2
      )
    );
  }
  object = new THREE.Mesh(new THREE.LatheGeometry(points, 20), material);
  object.position.set(-100, 0, -200);
  scene.add(object);

  object = new THREE.Mesh(new THREE.TorusGeometry(50, 20, 20, 20), material);
  object.position.set(100, 0, -200);
  scene.add(object);

  object = new THREE.Mesh(
    new THREE.TorusKnotGeometry(50, 10, 50, 20),
    material
  );
  object.position.set(300, 0, -200);
  scene.add(object);

  renderer = new THREE.WebGLRenderer({ antialias: true });
  renderer.setPixelRatio(window.devicePixelRatio);
  renderer.setSize(w, h);
  renderer.setAnimationLoop(animate);
  document.body.appendChild(renderer.domElement);

  stats = new Stats();
  document.body.appendChild(stats.dom);

  window.addEventListener("resize", onWindowResize);
}

function onWindowResize() {
  camera.aspect = window.innerWidth / window.innerHeight;
  camera.updateProjectionMatrix();

  renderer.setSize(window.innerWidth, window.innerHeight);
}

function animate() {
  render();
  stats.update();
}

function render() {
  const timer = Date.now() * 0.0001;
  camera.position.x = Math.cos(timer) * 800;
  camera.position.z = Math.sin(timer) * 800;

  camera.lookAt(scene.position);

  scene.traverse(function (object) {
    if (object.isMesh) {
      object.rotation.x = timer * 5;
      object.rotation.y = timer * 2.5;
    }
  });

  renderer.render(scene, camera);
}
2. 解説
1. 必要なモジュールのインポート
import * as THREE from 'three';
import Stats from 'three/addons/libs/stats.module.js';
- Three.jsライブラリをインポートして3D描画を可能にします。
- Statsモジュールは、レンダリングのパフォーマンス(FPSなど)を測定するためのツールです。
2. 基本的なセットアップ
let camera, scene, renderer, stats;
init();
camera:シーンを視点から観察するためのカメラ。scene:3Dオブジェクトを配置する空間。renderer:シーンをブラウザに描画するためのレンダラー。stats:パフォーマンスをモニターするためのインスタンス。init関数を呼び出し、セットアップを開始します。
3. 初期化(init関数)
カメラとシーンの設定
camera = new THREE.PerspectiveCamera(45, w / h, 1, 2000);
camera.position.y = 400;
scene = new THREE.Scene();
- カメラを視野45度、画面のアスペクト比、描画範囲1~2000で設定。
- カメラの位置をY軸400に設定して上からシーンを見下ろします。
- シーンを新規作成。
照明の追加
const ambientLight = new THREE.AmbientLight(0xcccccc, 1.5);
const pointLight = new THREE.PointLight(0xffffff, 2.5, 0, 0);
camera.add(pointLight);
scene.add(ambientLight);
scene.add(camera);
- 環境光(
AmbientLight)を追加して全体を明るくします。 - ポイントライト(
PointLight)をカメラに追加して、局所的にシーンを照らします。
ここで、ある疑問を持ちました。環境光(AmbientLight)とポイントライト(PointLight)はどちらも光源であるにもかかわらず、なぜ AmbientLight は scene に追加し、PointLight は camera に追加するのでしょうか?
AmbientLightとPointLightはどちらも光源ですが、それぞれの性質や用途が異なるため、sceneに直接追加するか、cameraに追加するかの違いがあります。この点について詳しく説明します。
1. AmbientLight(環境光)の特徴
環境光には以下のような特徴があります。
- 環境光はシーン全体を一様に照らします。
- 特定の方向を持たず、シーンのすべてのオブジェクトに均等に影響します。
- オブジェクトの影を生成しません。
シーンに追加する理由
- 環境光はシーン全体を照らすため、どこに配置しても効果が変わらない光源です。
- そのため、
sceneに直接追加され、カメラや他のオブジェクトに依存しない形で使われます。
2. PointLight(点光源)の特徴
- 点光源は特定の位置から周囲に球状に広がる光を放ちます。
- 光の強度は距離によって減衰します(
distanceやdecayパラメータで制御)。 - オブジェクトに影を落とすことが可能です。
カメラに追加する理由
- このプログラムでは、カメラがシーン内を動き回る仕様になっています。
- 点光源をカメラに追加すると、カメラが動くのに合わせて光源も一緒に動きます。
- これは、カメラ視点で常に特定の場所を照らす効果を得るために便利です。
- たとえば、カメラ周辺を照らす懐中電灯のような効果を持たせることができます。
3. 結果としての配置の違い
AmbientLightはシーン全体の基礎的な明るさを確保するため、sceneに直接追加します。PointLightはカメラの動きに追従させたい目的があるため、cameraに追加します。
コードの挙動を視覚的に理解する
AmbientLight
→ シーン全体を一様に明るくするバックグラウンドの光源。PointLight
→ カメラとともに動きながら周囲を照らし、立体感や動的な光の効果を強調します。
両方を使うことで、より現実的で視認性の高いシーンを作成しています。
マテリアルとジオメトリの作成
const map = new THREE.TextureLoader().load('textures/uv_grid_opengl.jpg');
const material = new THREE.MeshPhongMaterial({ map: map, side: THREE.DoubleSide });
- テクスチャ画像(
uv_grid_opengl.jpg)をロード。 MeshPhongMaterialを使用して、光沢感のあるマテリアルを作成。- テクスチャが両面に描画されるよう設定。
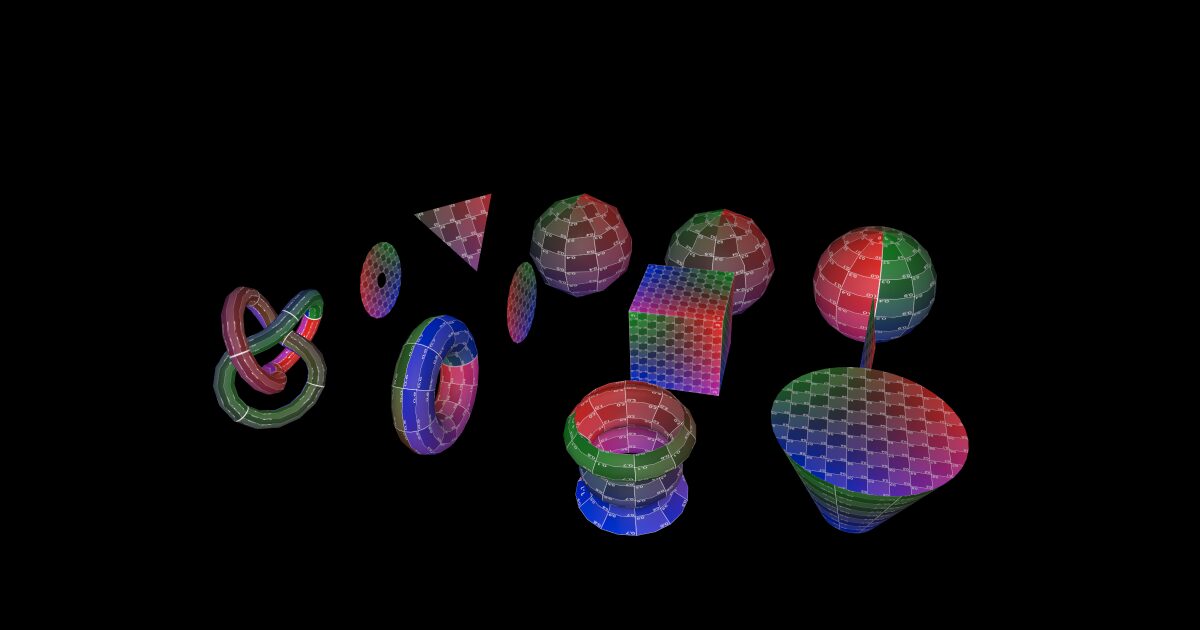
複数のオブジェクトを作成
コードでは、以下のようなジオメトリを作成してシーンに追加しています。
- 球(
SphereGeometry) - 正20面体(
IcosahedronGeometry) - 正8面体(
OctahedronGeometry) - 正4面体(
TetrahedronGeometry) - 平面(
PlaneGeometry) - 立方体(
BoxGeometry) - 円(
CircleGeometry) - 円環(
RingGeometry) - 円柱(
CylinderGeometry) - 回転体(
LatheGeometry) - ドーナツ型(
TorusGeometry) - トーラス結び目(
TorusKnotGeometry)
レンダラーとイベントリスナー
renderer = new THREE.WebGLRenderer({ antialias: true });
renderer.setSize(w, h);
renderer.setAnimationLoop(animate);
document.body.appendChild(renderer.domElement);
- WebGLレンダラーを作成し、アンチエイリアスを有効化。
- 描画サイズをウィンドウサイズに設定。
- アニメーションループで
animate関数を呼び出し続ける。 - 描画領域をHTMLドキュメントに追加。
4. ウィンドウサイズの変更対応
function onWindowResize() {
  camera.aspect = window.innerWidth / window.innerHeight;
  camera.updateProjectionMatrix();
  renderer.setSize(window.innerWidth, window.innerHeight);
}
- ウィンドウサイズ変更時に、カメラとレンダラーの設定を更新。
5. アニメーションとレンダリング
アニメーションループ(animate関数)
function animate() {
  render();
  stats.update();
}
- シーンを描画する
render関数とパフォーマンスを更新するstats.updateを実行。
レンダリング処理(render関数)
const timer = Date.now() * 0.0001;
camera.position.x = Math.cos(timer) * 800;
camera.position.z = Math.sin(timer) * 800;
camera.lookAt(scene.position);
scene.traverse(function (object) {
  if (object.isMesh) {
    object.rotation.x = timer * 5;
    object.rotation.y = timer * 2.5;
  }
});
renderer.render(scene, camera);
- カメラを円形に動かしながらシーンを中心に向ける。
- 全オブジェクトを順に巡回し、メッシュの場合は回転アニメーションを適用。
- レンダラーでシーンを描画。
まとめ
基本的なことが書かれている大変有用なサンプルでした。
